by

HomeKit Automation: Extracting HomeKit Pairing Keys from macOS

EN

"HomeKit Pairing Keys"

Introduction

While the Home app allows you to read and control your HomeKit-based devices on macOS, iPadOS and iOS, sometimes you want more control. You may want to bridge a sensor to another protocol, expose your home temperature on a public API, or simply export the historical data to a CSV file. Either way, the HomeKit framework is currently a private API on macOS, and it is not available on other platforms like Linux or Windows.

Fortunately, there are some cross-platform implementations of the HomeKit Accessory Protocol that support controller-mode functionality:

In particular, HomeKit Python supports reading and writing HomeKit characteristics on paired devices as well as generating additional pairings. The main problem is that HomeKit devices typically support only one main pairing controller. Thus, once a device is paired with the Apple Home app, it can only be controlled with the pairing keys managed by the homed system daemon, which are gated by the HomeKit framework.

Fortunately, the HomeKit pairing keys are stored in iCloud Keychain. Unfortunately (but reasonably), the system tries hard to hide these pairing keys. In particular, they neither appear in the Keychain app nor can they be read with the Security framework SecItem* family of APIs without private entitlements granting access to the keychain access group com.apple.hap.pairing.

Process

First of all, we have to subvert the AMFI security model to be able to sign arbitrary executables with private entitlements. To do it, we have to disable System Integrity Protection and AMFI. By rebooting into Recovery OS, we can disable the protections using the Terminal app:

$ csrutil disable
$ nvram boot-args=amfi_get_out_of_my_way=0x1
$ reboot

After reboot, we can use KeychainTool to dump the HomeKit keychain items:

$ git clone https://github.com/pvieito/KeychainKit.git
$ cd KeychainKit
$ cat KeychainTool/KeychainTool.entitlements
# The all-powerful * `keychain-access-groups` entitlement which grants its bearer permission to read all keychain items:
<?xml version="1.0" encoding="UTF-8"?>
<!DOCTYPE plist PUBLIC "-//Apple//DTD PLIST 1.0//EN" "http://www.apple.com/DTDs/PropertyList-1.0.dtd">
<plist version="1.0">
<dict>
    <key>keychain-access-groups</key>
    <array>
        <string>*</string>
    </array>
</dict>
</plist>

Now we will compile and run KeychainTool to dump all the keychain entries in the com.apple.hap.pairing access group:

$ swift run KeychainTool -g com.apple.hap.pairing
[*] HomeKit Pairing Identity (com.apple.hap.pairing)
[ ] Account: 7C73D188-BF12-4B8C-B7A5-5842D71C24EA
[ ] Key: “21159cfa6032438be197d668b3562e262441965789f95634d6460d4cce5cc706+d2ed8558b369b4ee1fbf4f9eb8d687ee2799aba5608efc2712d8175697bd8ad8”
[*] Paired HomeKit Accessory: CC:0D:07:E4:F7:54 (com.apple.hap.pairing)
[ ] Account: CC:0D:07:E4:F7:54
[ ] Key: “3a4473f1efe5e378fdd329826936f34b674fcb97c8aa5bd9818abde46963f864”
[*] Paired HomeKit Accessory: 58:CA:96:CE:66:5F (com.apple.hap.pairing)
[ ] Account: 58:CA:96:CE:66:5F
[ ] Key: “44d34407d583aee3b12b774a6eb15ee96c527fa83af1db66ac90f60494bbbc29”

Voilà! Here we have all we need:

  • The HomeKit Pairing Identity entry contains the pairing identifier stored as the item account name: 7C73D188-BF12-4B8C-B7A5-5842D71C24EA and the LTP and LTS keys required by the HomeKit protocol separated by a + sign on the entry key payload: 21159cfa6032438be197d668b3562e262441965789f95634d6460d4cce5cc706, d2ed8558b369b4ee1fbf4f9eb8d687ee2799aba5608efc2712d8175697bd8ad8
  • Each accessory has its own Paired HomeKit Accessory keychain entry containing its pairing key. For example, the device 58:CA:96:CE:66:E9 has the LTP key 44d34407d583aee3b12b774a6eb15ee96c527fa83af1db66ac90f60494bbbc29.

Now we can use the pairing keys to set up HomeKit Python on any device and platform:

$ python3 -m pip install "homekit[IP]" --user
$ python3 -m homekit.discover
# `homekit_python` will list all HomeKit devices found on the network:
Name: Eve Extend XXXX._hap._tcp.local.
Url: http_impl://192.168.0.123:8080
Configuration number (c#): 5
Feature Flags (ff): Supports HAP Pairing (Flag: 1)
Device ID (id): 58:CA:96:CE:66:5F  # Same Device ID as in the keychain entry.
Model Name (md): Eve Extend XXXXXXXX
Protocol Version (pv): 1.1
State Number (s#): 1
Status Flags (sf): Accessory has been paired. (Flag: 0)
Category Identifier (ci): Bridge (Id: 2)
$ mkdir ~/.homekit_python
$ python3 -m homekit.init_controller_storage -f ~/.homekit_python/pairing.json
$ nano ~/.homekit_python/pairing.json
# Write the pairing credentials for each device:
{
  "EveExtend": {
    "AccessoryPairingID": "58:CA:96:CE:66:E9",
    "AccessoryLTPK": "44d34407d583aee3b12b774a6eb15ee96c527fa83af1db66ac90f60494bbbc29",
    "iOSPairingId": "7C73D188-BF12-4B8C-B7A5-5842D71C24EA",
    "iOSDeviceLTSK": "d2ed8558b369b4ee1fbf4f9eb8d687ee2799aba5608efc2712d8175697bd8ad8",
    "iOSDeviceLTPK": "21159cfa6032438be197d668b3562e262441965789f95634d6460d4cce5cc706",
    "AccessoryIP": "192.168.0.123",
    "AccessoryPort": 8080,
    "Connection": "IP"
  }
}
$ python3 -m homekit.identify -f ~/.homekit_python/pairing.json -a EveExtend
# The HomeKit device should identify itself (for example, by blinking an LED).
$ python3 -m homekit.get_accessories -f ~/.homekit_python/pairing.json -a EveExtend
# Shows all the accessories exposed by the device.
$ python3 -m homekit.get_characteristic -f ~/.homekit_python/pairing.json -a EveExtend -c 3.38
# Shows the value of a given characteristic, for example the room relative humidity:
{
    "3.38": {
        "value": 54.4525146484375
    }
}

Finally, remember to re-enable System Integrity Protection and reboot your Mac:

$ csrutil clear
Jailbreaking macOS: Patching AMFI to Allow Arbitrary Entitlements

EN

"Patching amfid"

Introduction

Entitlements are an important part of Apple’s security architecture. They allow Apple to restrict OS features to Apple-approved processes. Nowadays, even with System Integrity Protection disabled, the AMFI kernel extension and the amfid process will always kill at launch any process that has restricted entitlements but is not signed by Apple or does not have a properly approved embedded provisioning profile.

Unrestricted entitlements are available to all signed binaries, even ad hoc (some examples are the sandbox entitlements com.apple.security.* or the application identifier entitlement com.apple.application-identifier), but they do not give the process any special capability. On the contrary, they limit its reach.

To allow any entitlements, even the more interesting restricted ones, for a Developer ID-signed binary, we have to modify the amfid process (to allow ad hoc signatures too, we would have to patch the AMFI kernel extension or its underlying dependencies, which I didn’t try).

Process

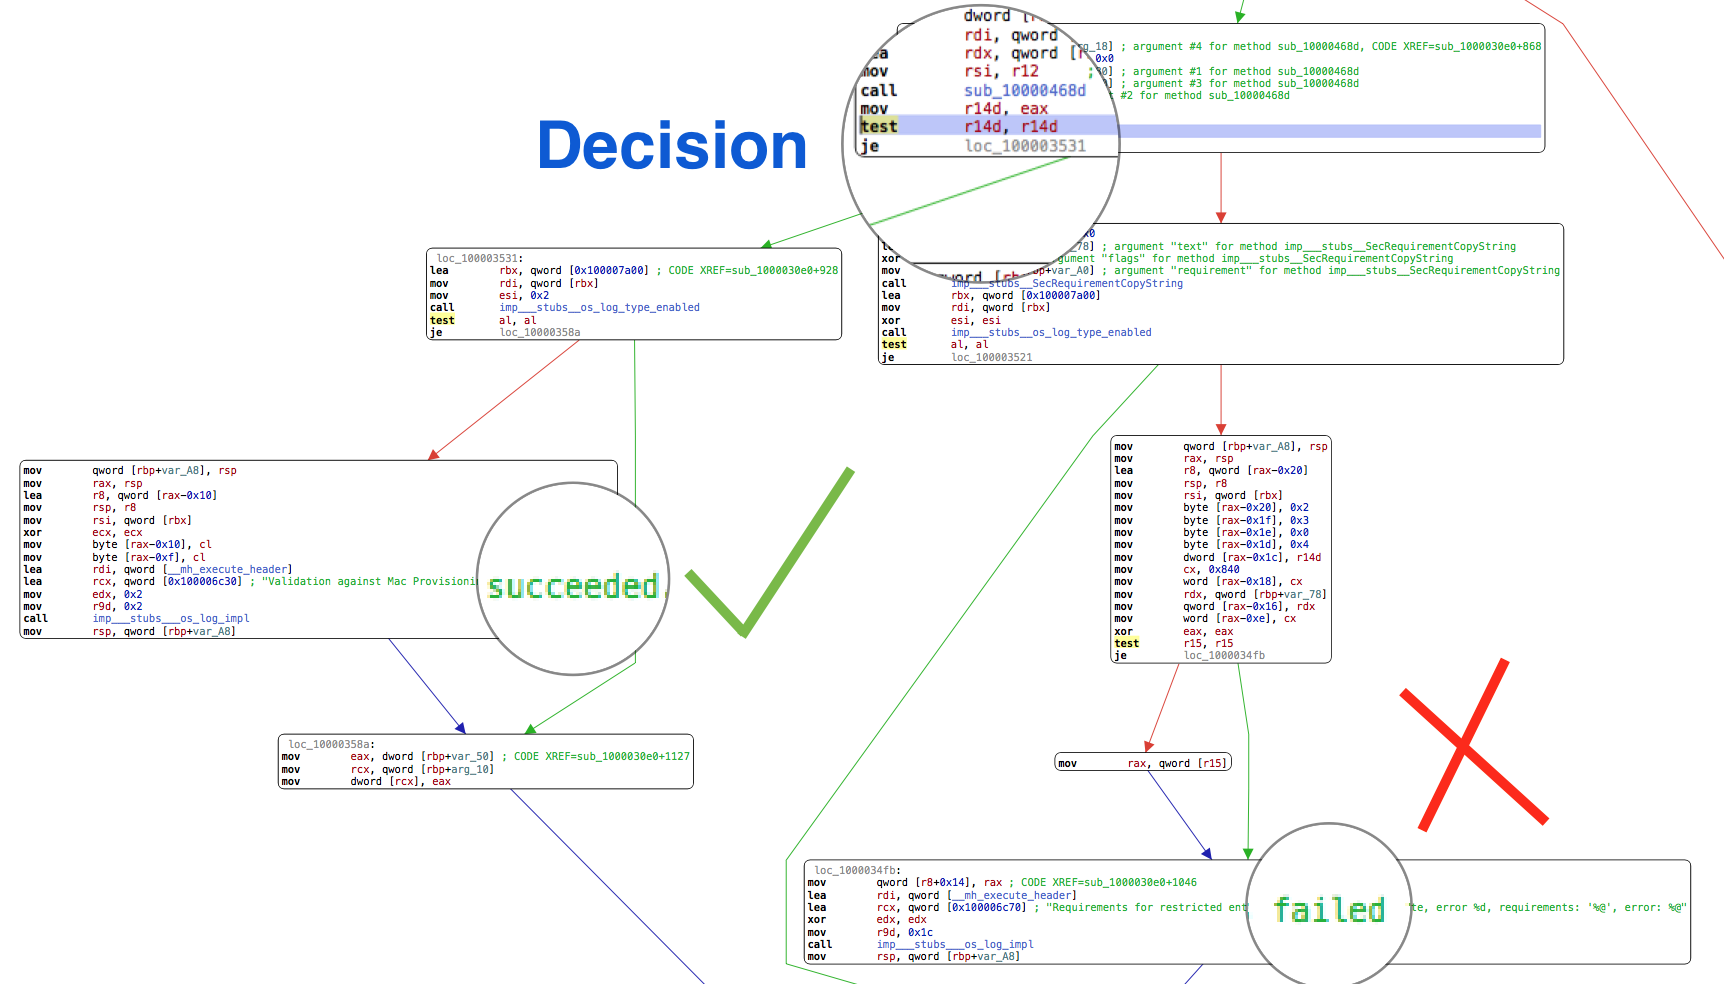
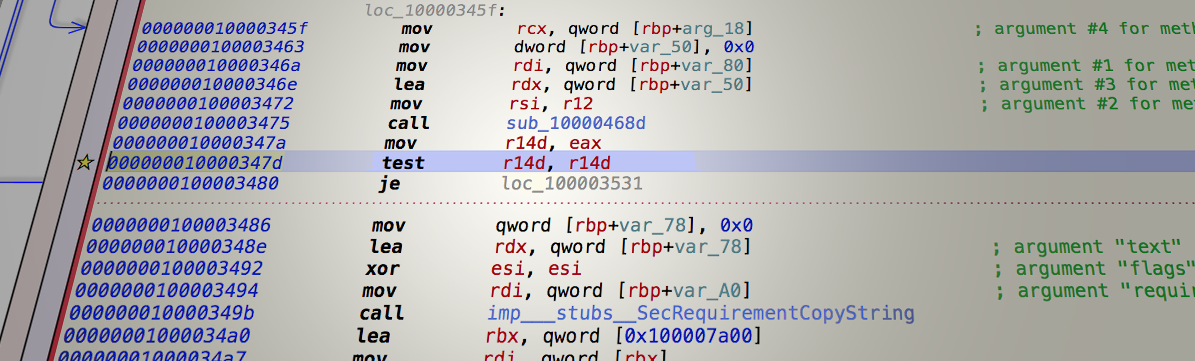
To patch a system daemon, we have to disable macOS System Integrity Protection. After some reverse engineering, it seems one of the main decisions in the amfid flow is at address offset 0x347D.

"Patching amfid"

Decision flow of amfid.

Knowing that we can change the following two instructions from:

test %r14, %r14
je loc_100003531

To this:

mov %r14, %r15
jno loc_100003531

This way, the flow will always jump to loc_100003531 and %r14 will become null (%r15 is always null at this point), so every Developer ID-signed process will be validated even without a provisioning profile allowing its entitlements.

Code

To achieve this modification, we can go the hard way by modifying the binary in situ (it is located at /usr/libexec/amfid) or the soft way: patching amfid memory at runtime. I preferred the second option so I could restart the unpatched amfid code by simply killing it.

To do it, I ported to Python 3 a wrapper for Mach VM APIs called pymach and added a new function to get the ASLR slice offset of the process: PyMach for Python 3. With that, I wrote this script for macOS 10.12.2. To use it, simply run:

$ sudo ./amfid_patch.py

And answer yes when asked if you want to patch the process. Voilà! Now any Developer ID-signed binaries will be executed even with restricted entitlements.

You can set any entitlement you want, like com.apple.developer.icloud-container-identifiers or com.apple.private.appleaccount.app-hidden-from-icloud-settings, with an arbitrary iCloud container. For a complete list of private entitlements used by Apple, you can go to Jonathan Levin’s Entitlements Database.

References

iCloud Locations in macOS

EN

Sandboxed vs. Non-Sandboxed

On macOS, an app may or may not be sandboxed. Since macOS Sierra, apps distributed outside the Mac App Store can access iCloud APIs, so a non-sandboxed app can use these locations to sync data.

So, if you want to access a sandboxed iCloud location, you should go to the app container and use it as the home path.

$SANDBOXED_CONTAINER = ~/Library/Container/com.example.app/Data

iCloud Documents

Each app can have one or more document containers inside, named with its bundle ID:

~/Library/Mobile Documents/

The information and details of each container are stored here:

~/Library/Application Support/CloudDocs/session/containers

The info is stored in a plist file with the name of the container, for example:

iCloud.com.pvieito.Example.plist

And the icons are stored in a folder with the name of the container:

iCloud.com.pvieito.Example/40x40_iOS.png
iCloud.com.pvieito.Example/80x80_iOS.png
iCloud.com.pvieito.Example/120x120_iOS.png

Key-Value Store

This synced data is stored as a property list file in:

~/Library/SyncedPreferences/
$(SANDBOXED_CONTAINER)/Library/SyncedPreferences/

CloudKit

CloudKit works online, but macOS stores a cache of its contents in a folder appropriately called CloudKit:

~/Caches/CloudKit
$(SANDBOXED_CONTAINER)/CloudKit

Coldplay Xyloband Reverse Engineering

EN

The Xyloband is the wristband that Coldplay gives to the audience to create a colorful light show during its concerts.

Xyloband

Fotografía de Carlos RM (CC) 2012.

The wristband receives data from a central transmitter. The new version of the band is not only able to light the LEDs but can also receive audio and play it through a built-in speaker.

Contents

Procedure

First, we will disassemble the device and list the different components that we find on the PCB. Then we will try to investigate them by looking for datasheets and all the available information to reconstruct the behavior of the circuit. Finally, we can recover the blueprint of the tracks on the PCB and analyze the complete system.

Disassembly

So I took the Dave Jones approach: “Don’t turn it on, take it apart!” First, I opened the wristband and extracted the PCB with the LED band.

Xyloband internals

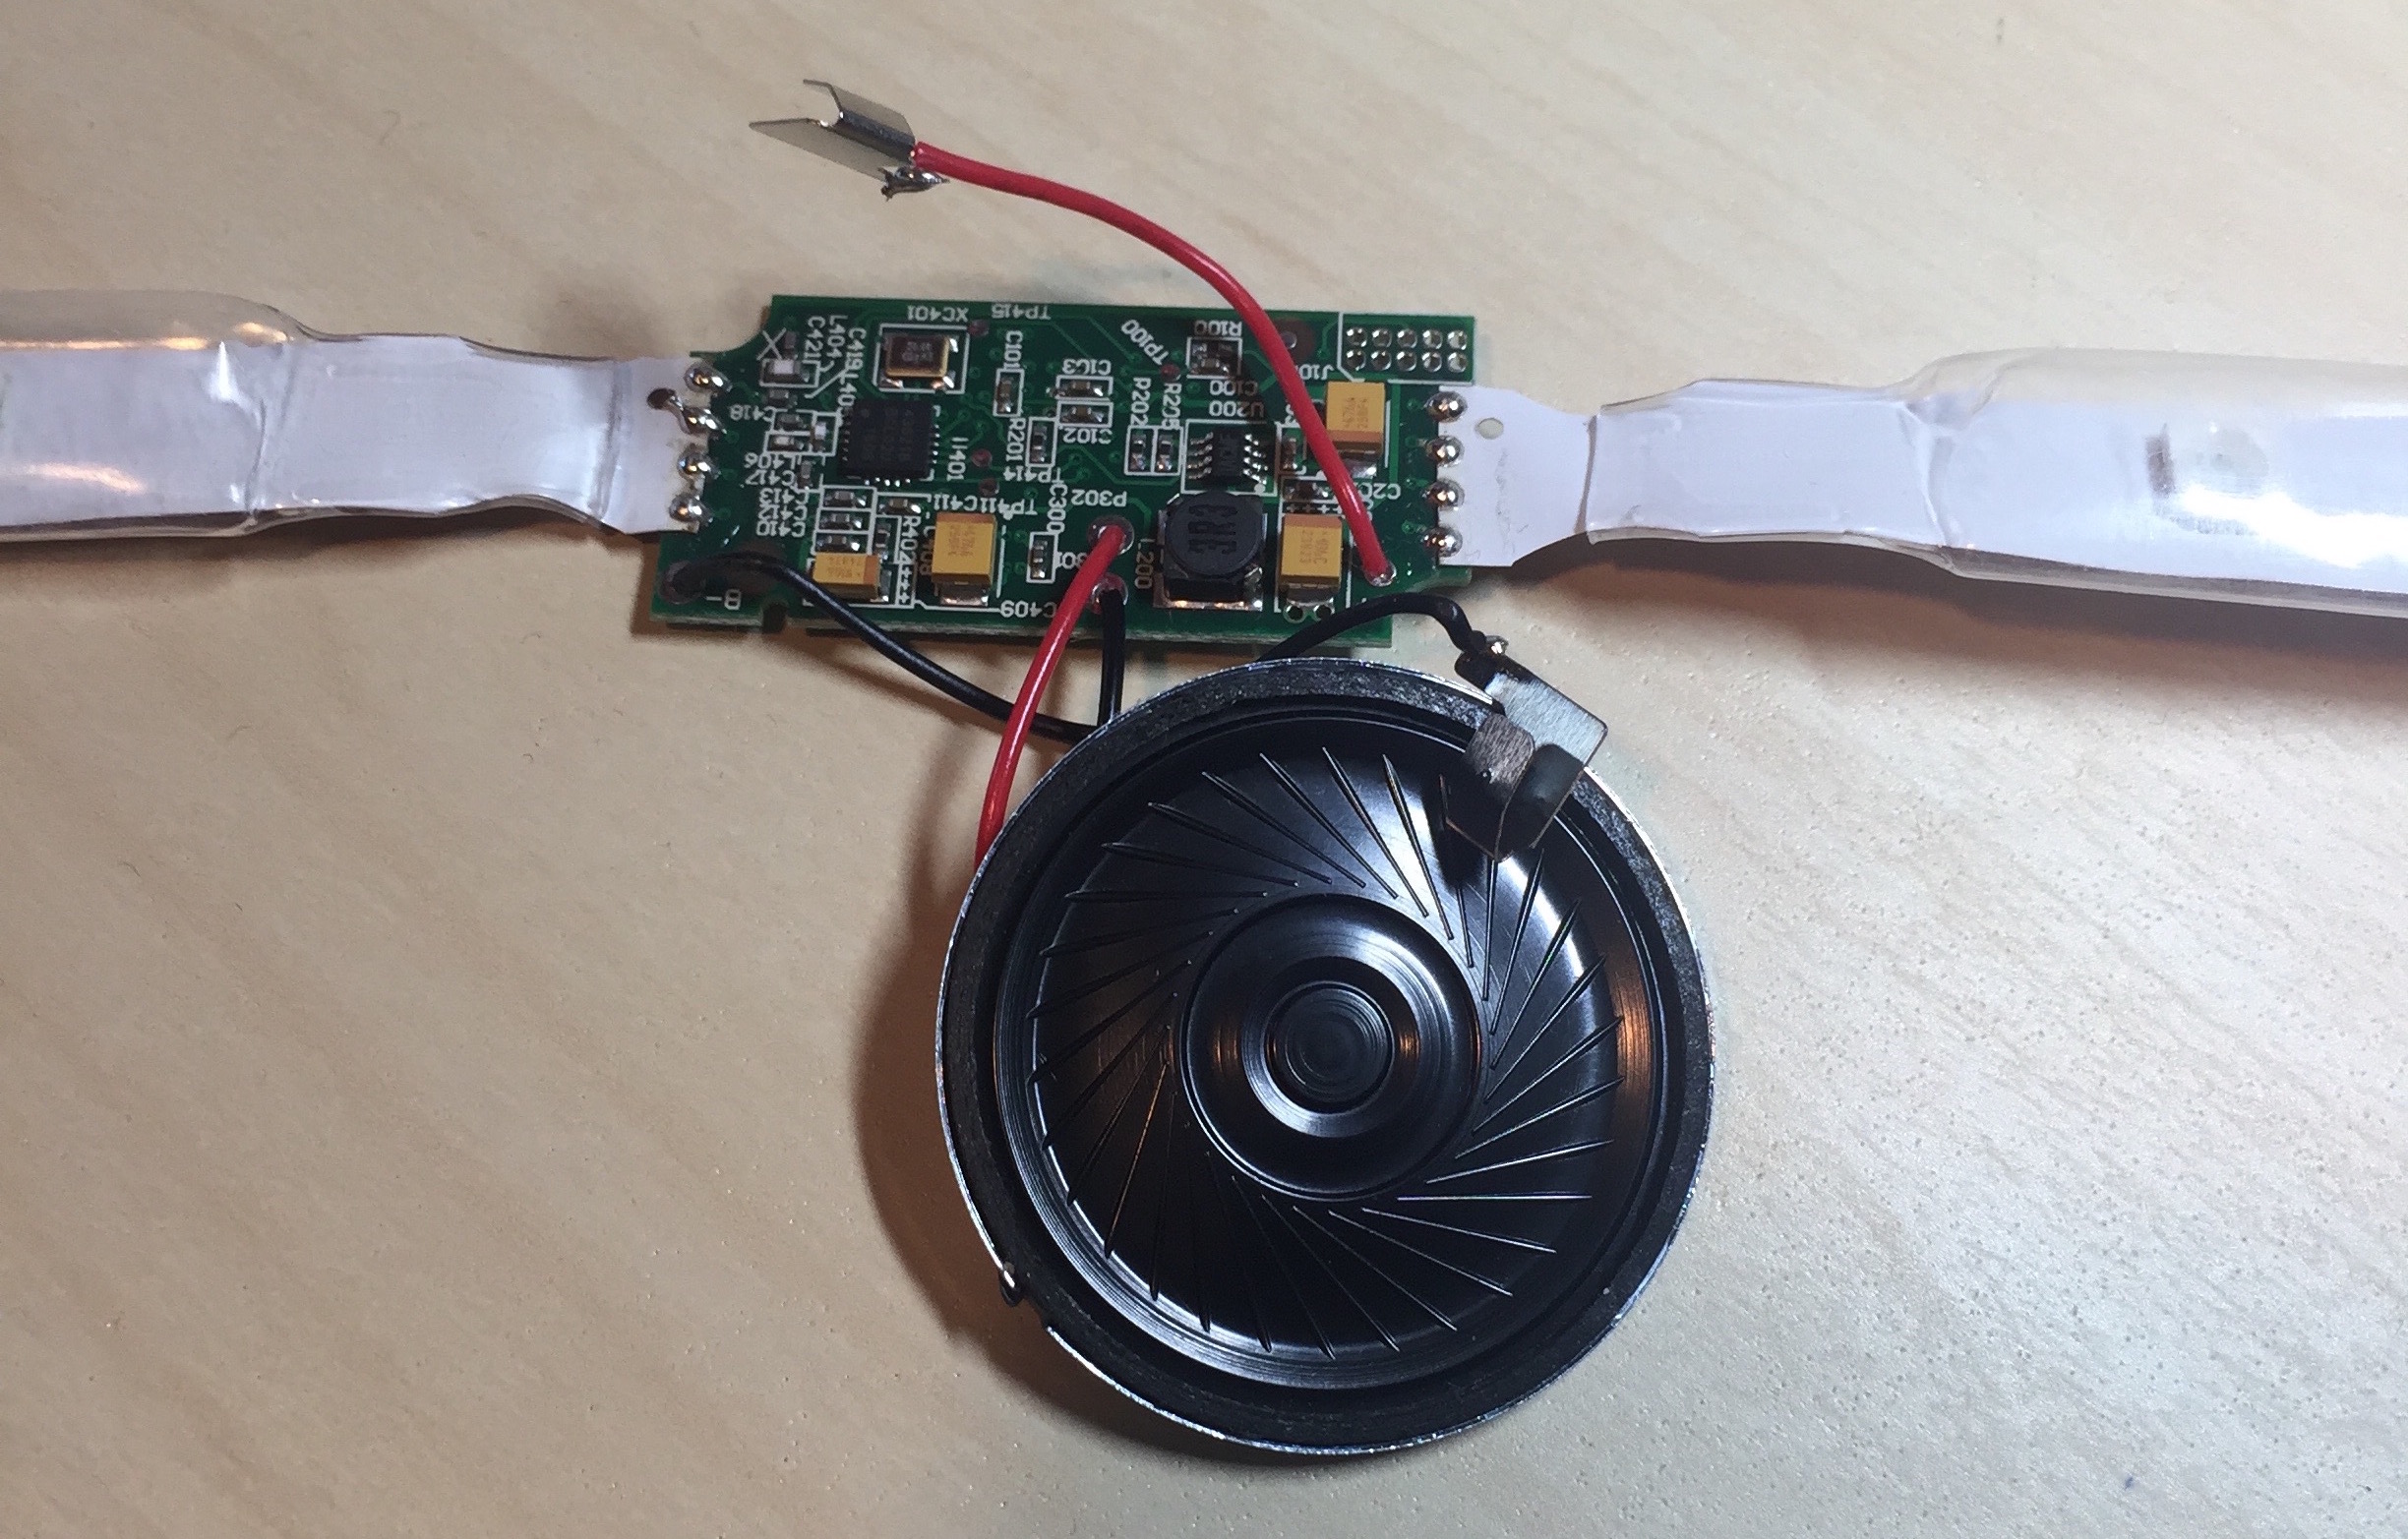
Xyloband internals: speaker, LED/antenna flat-flex and PCB.

These are the internal parts of the Xyloband. We can see the speaker, the flat-flex with the LEDs and the main PCB. From this view, we can infer that the flat-flex will probably not only power the color LEDs but also act as an antenna to receive the signal.

PCB Inspection

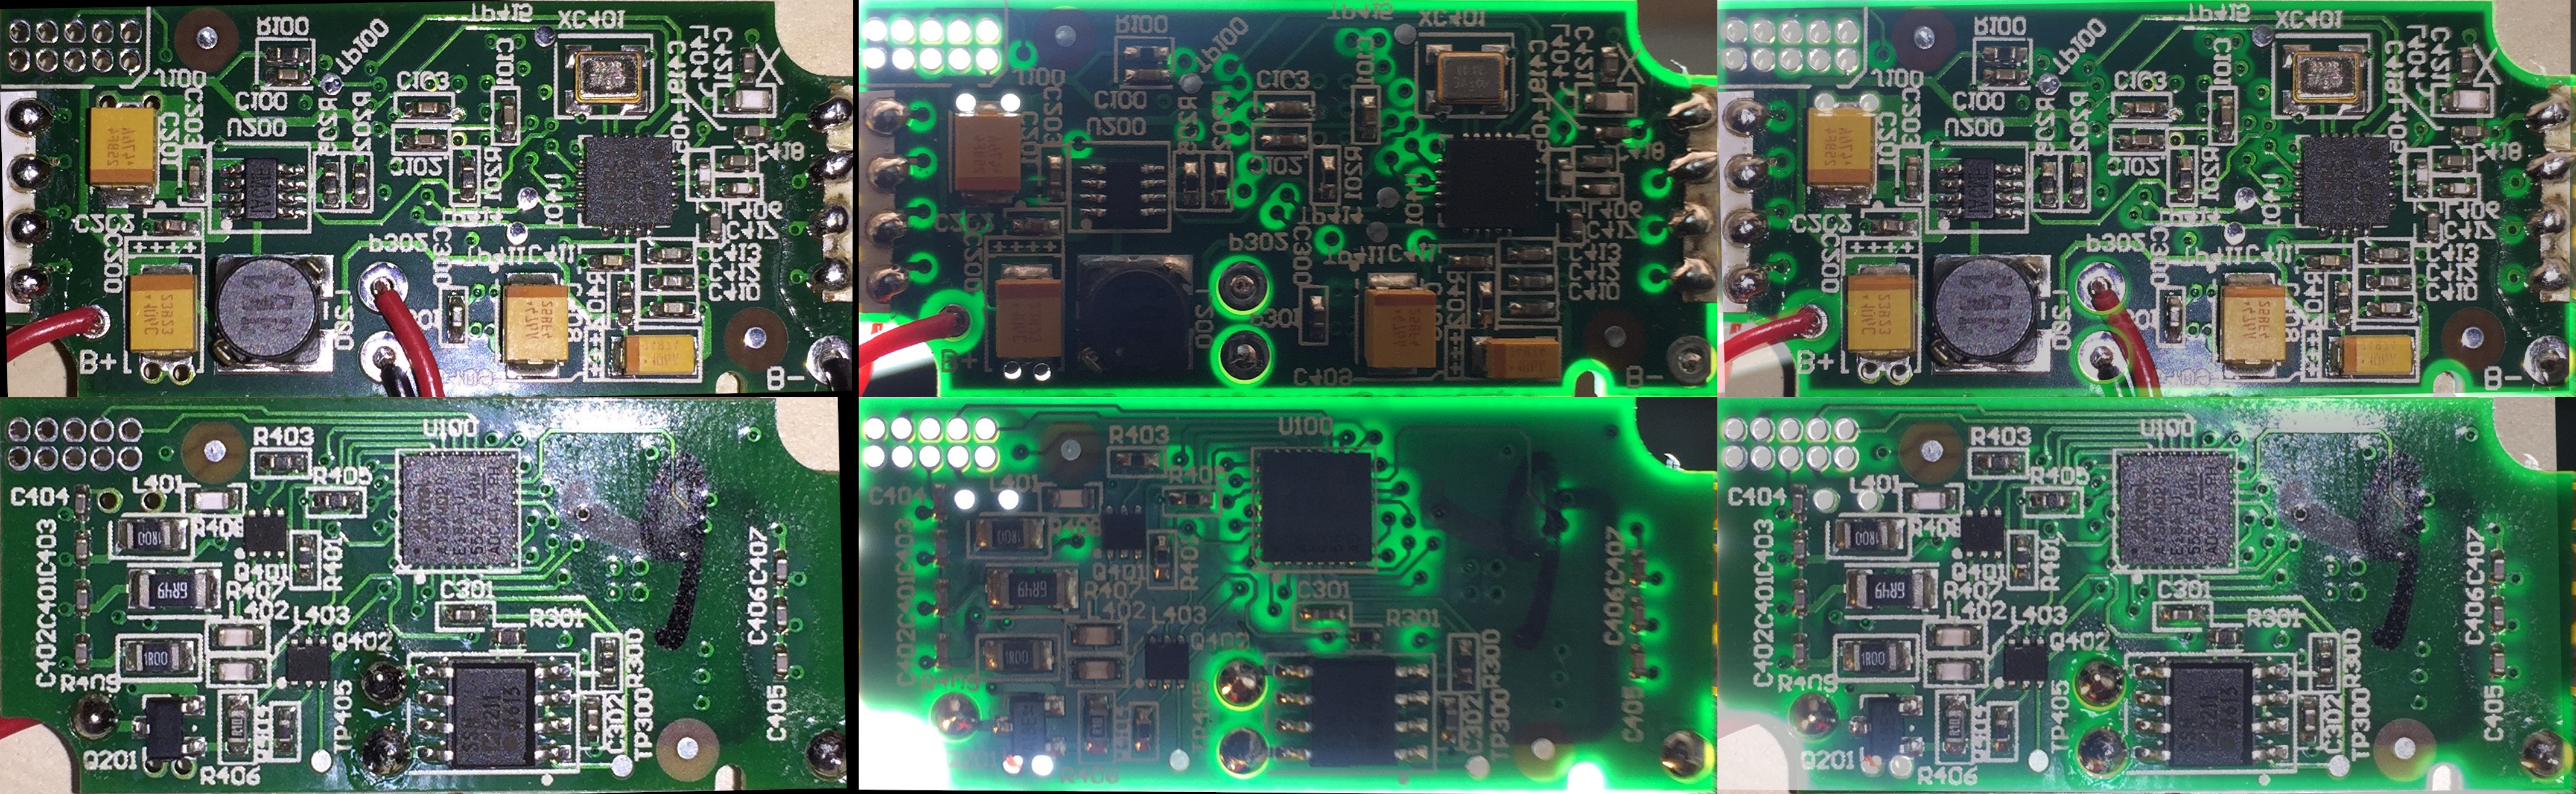
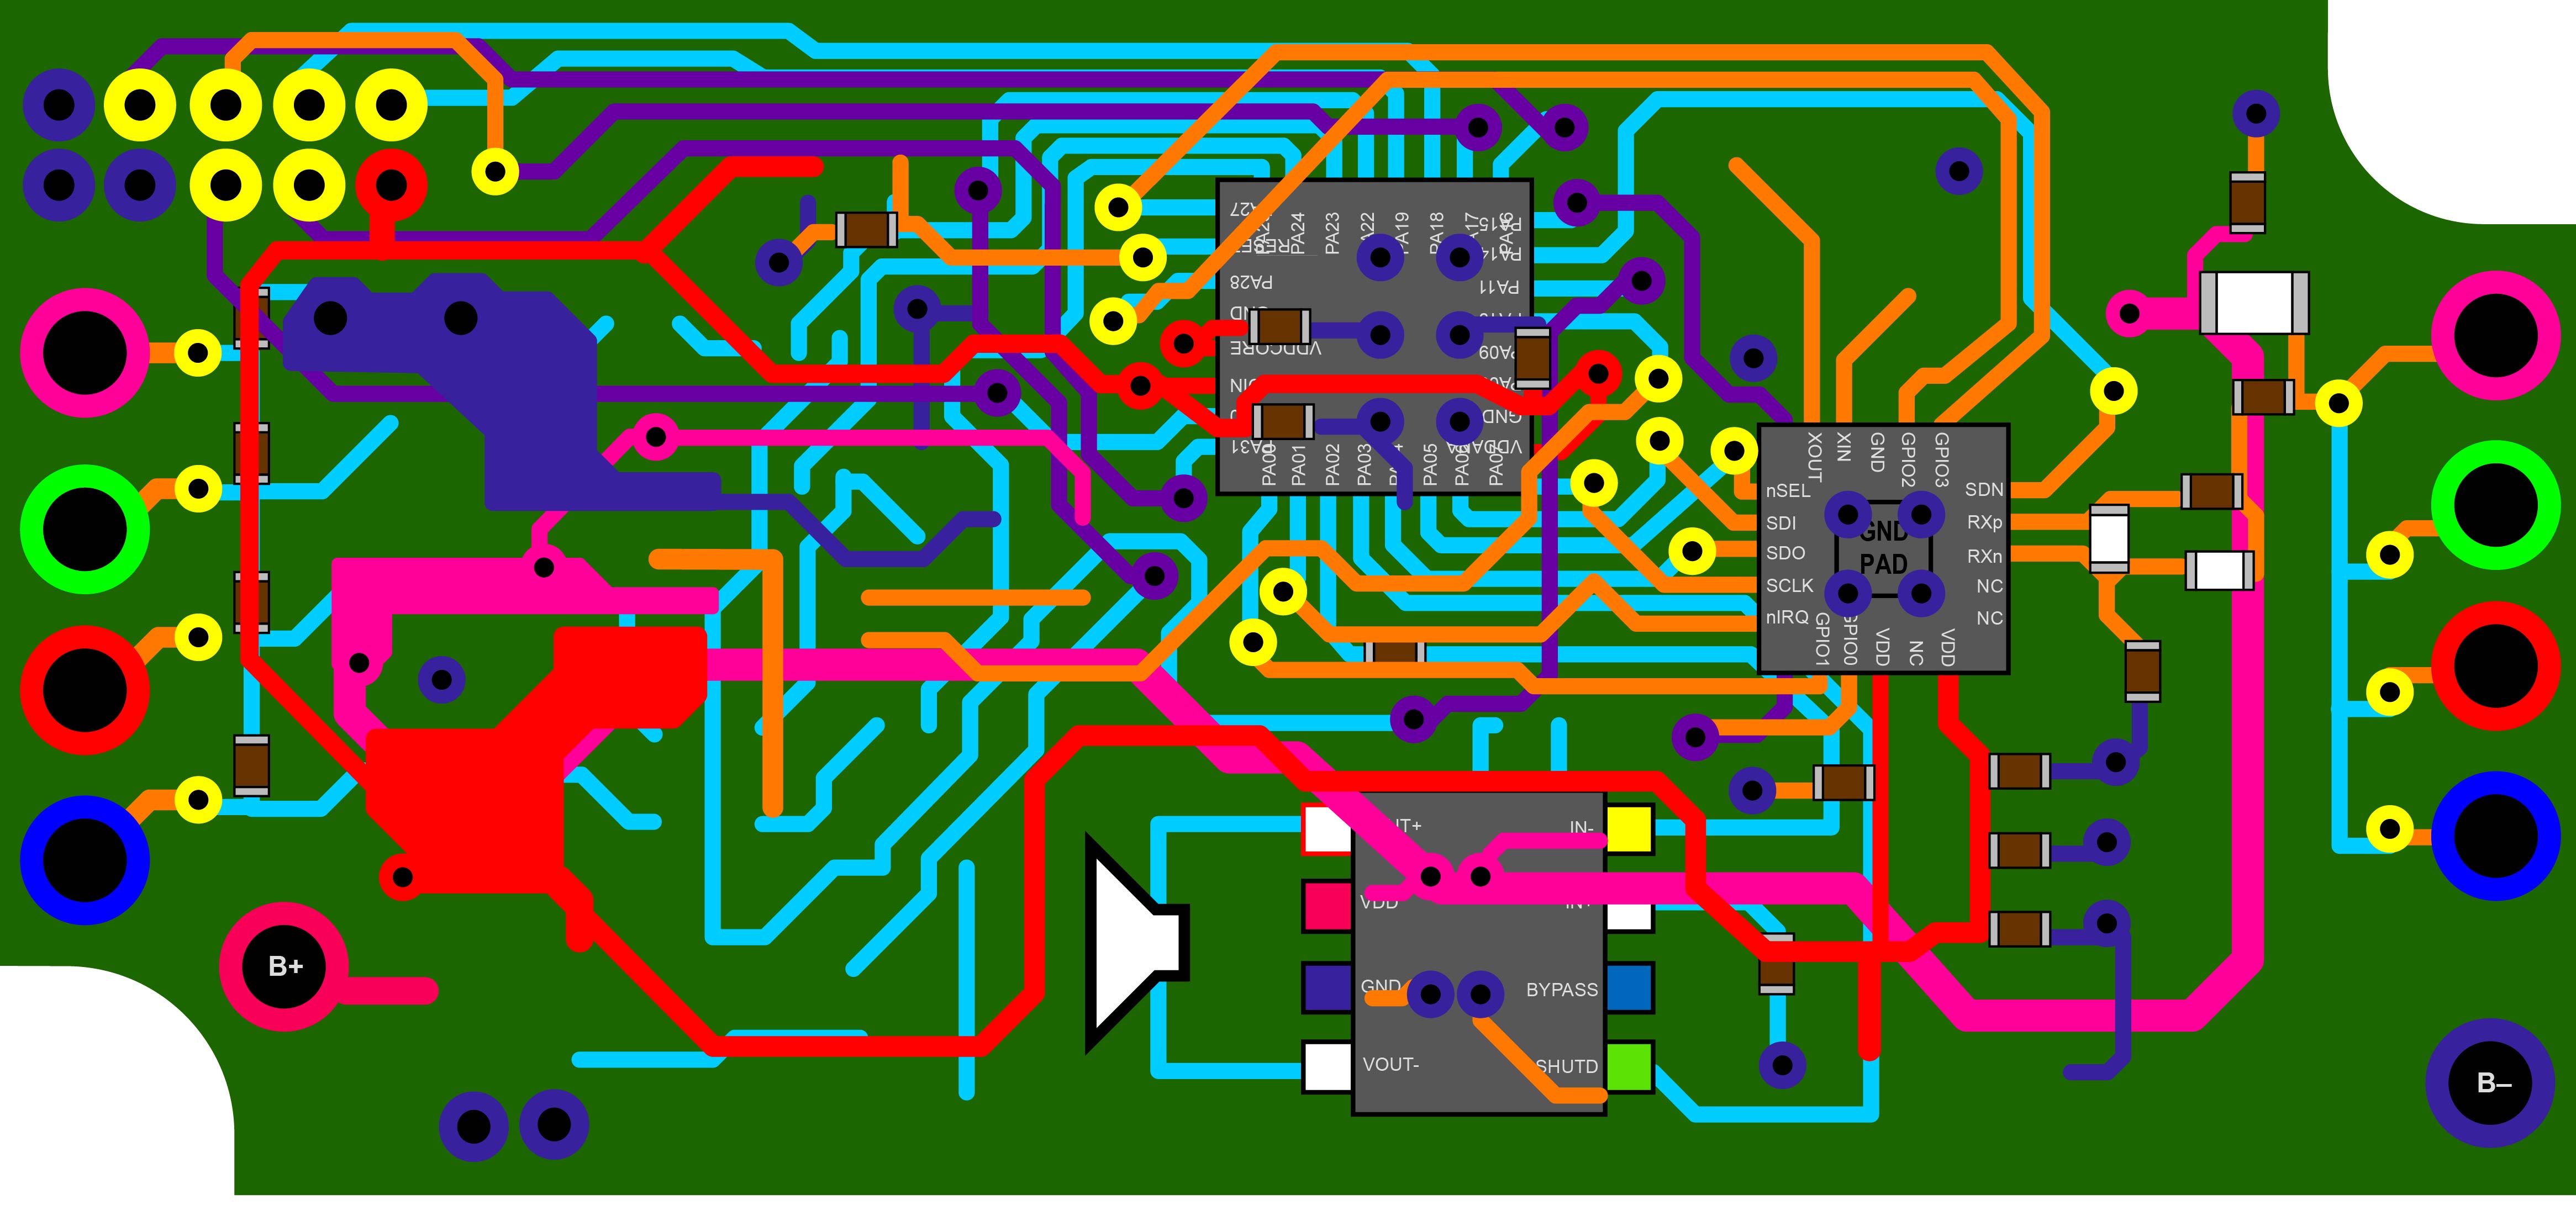
To get a good view of the PCB layers, I took two photos from each side, one front-lit and another back-lit. After that, we can create a composite image for each side to determine whether there are internal layers. And indeed, there are.

Xyloband PCB Front

Both sides of the PCB, front-lit, back-lit and composite.

The PCB has 4 layers, two external and two internal. In parentheses is the color used later in the PCB track blueprint:

  • Front side (Orange)
  • Back side (Cyan)
  • Internal ground layer (Navy Blue)
  • Internal track layer (Purple)

Now we will analyze each layer in detail.

Front

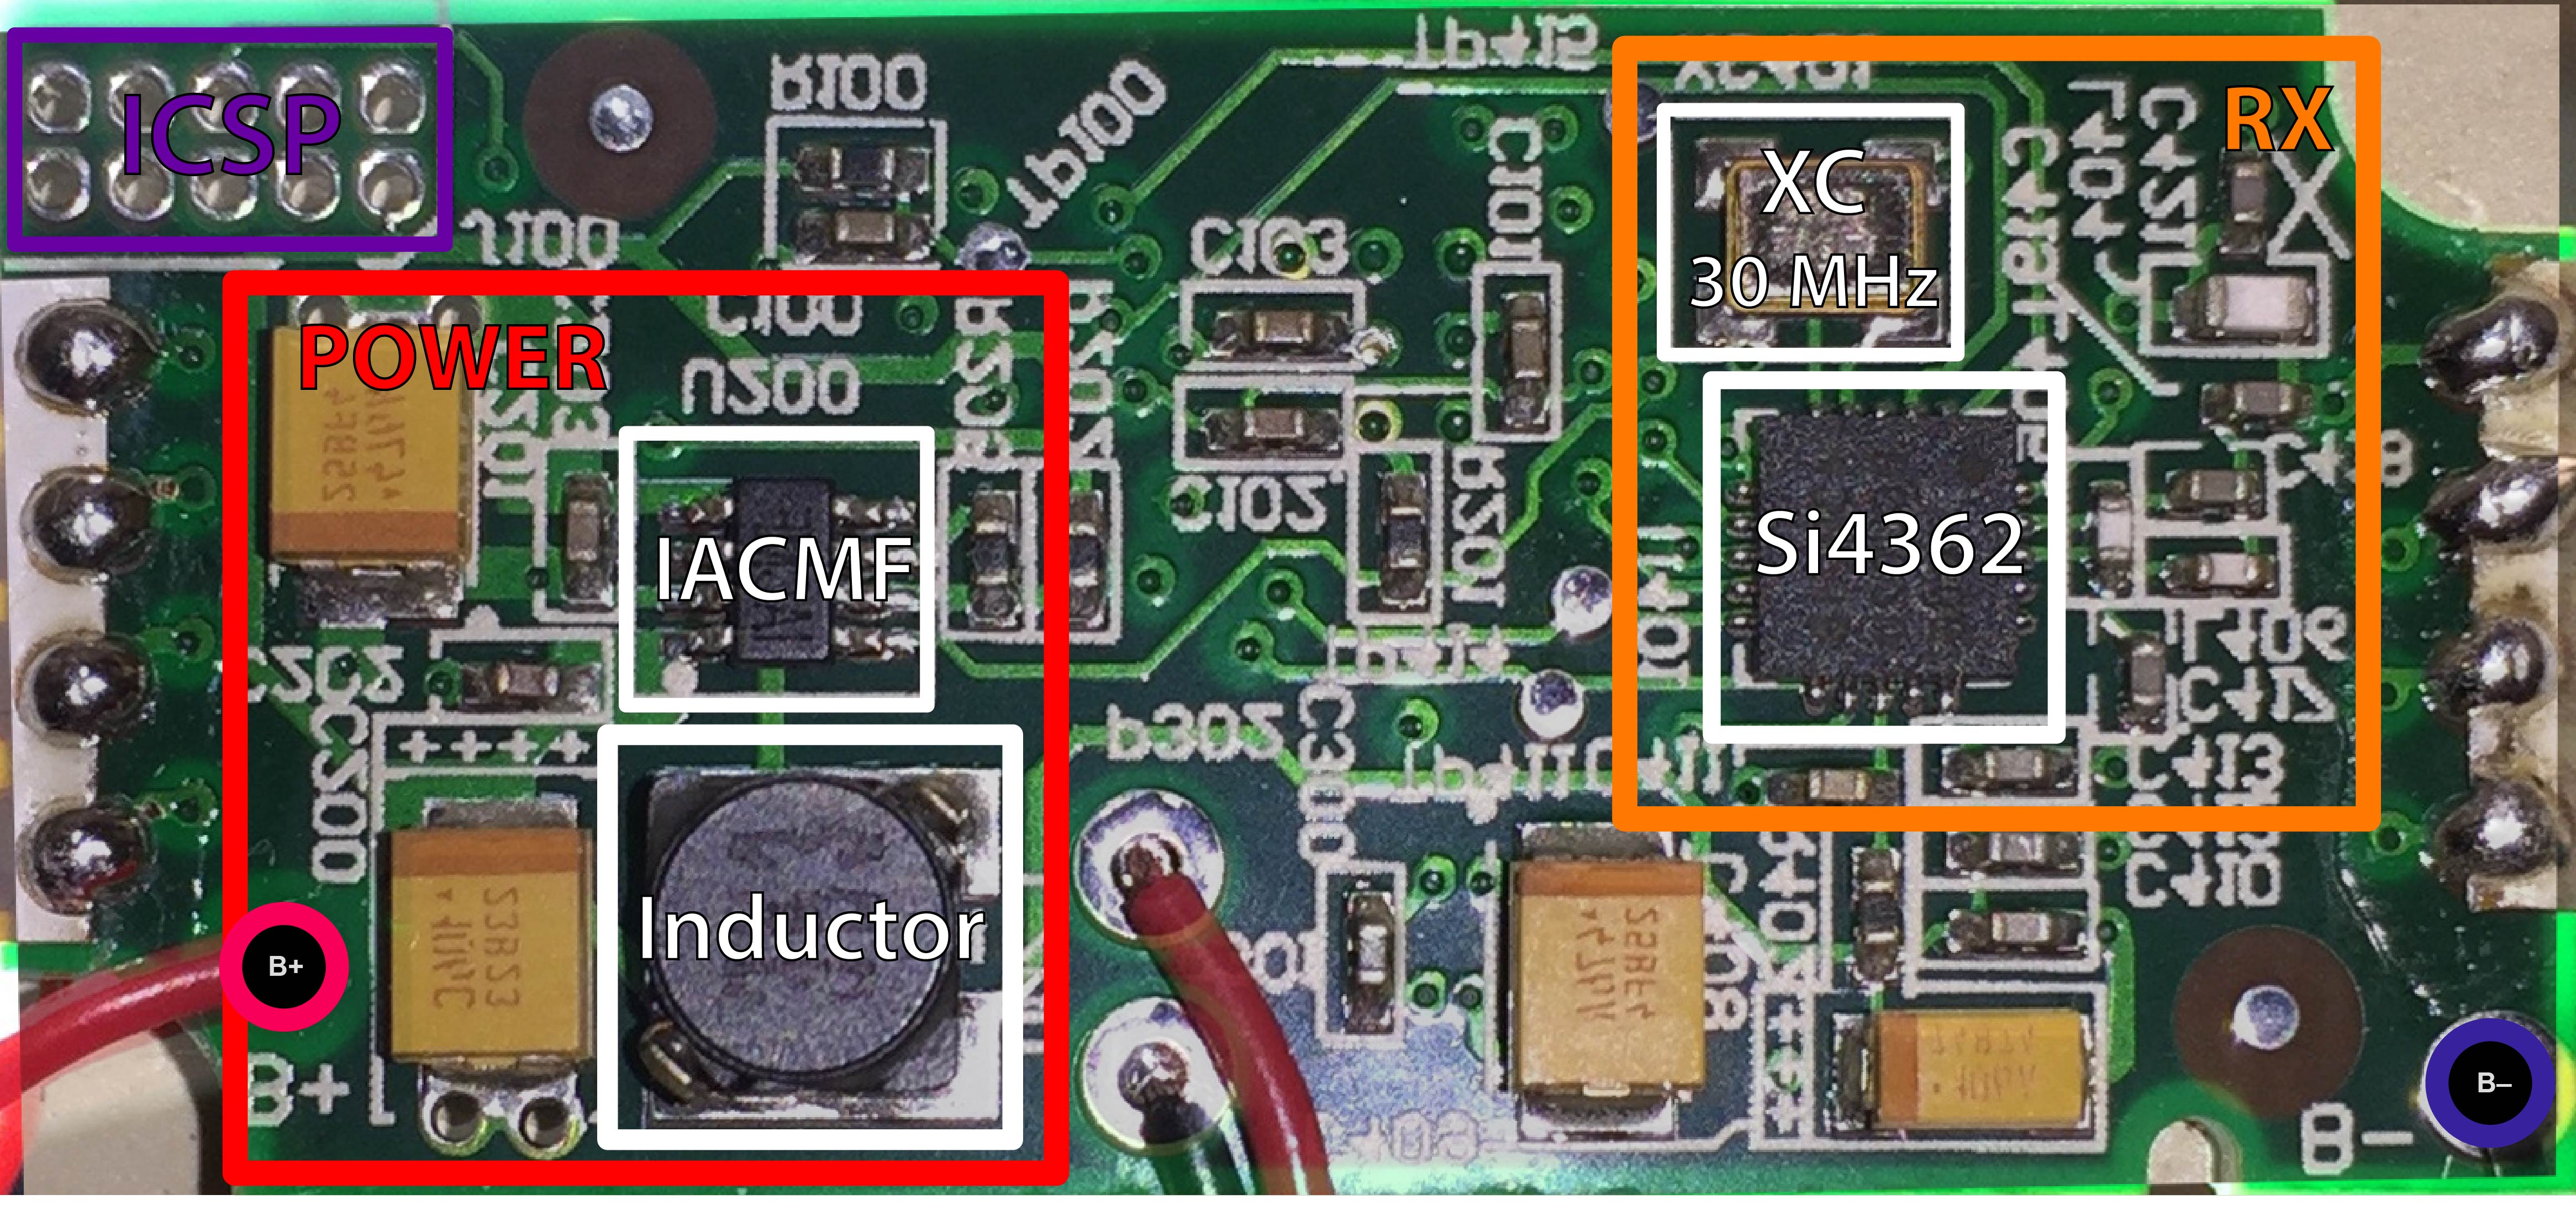
So here is the first composite image of the front side with its main areas, power and data reception, demodulation and decoding (RX):

Xyloband PCB Front

Composite image of the front of the Xyloband PCB. Horizontally flipped image to match the back layer.

In the front of the Xyloband PCB we can find these devices:

  • Silicon Labs Si4362 High-Performance, Low-Current Receiver
  • 30 MHz Crystal Oscillator
  • IC IACMF Voltage Regulator
  • 3 mH Inductor

The Si4362 IC is the main component of the RX area. This chip will receive the transmission from the antenna (we can see it is connected to the uppermost pin of the flat-flex), amplify it using a low-noise amplifier and demodulate it. Then, the final digital signal will be sent to the microcontroller on the other side of the board through an I²C connection.

The power section of the front side is mainly a voltage controller that generates the suitable voltage to drive the LEDs and the audio amplifier.

Back

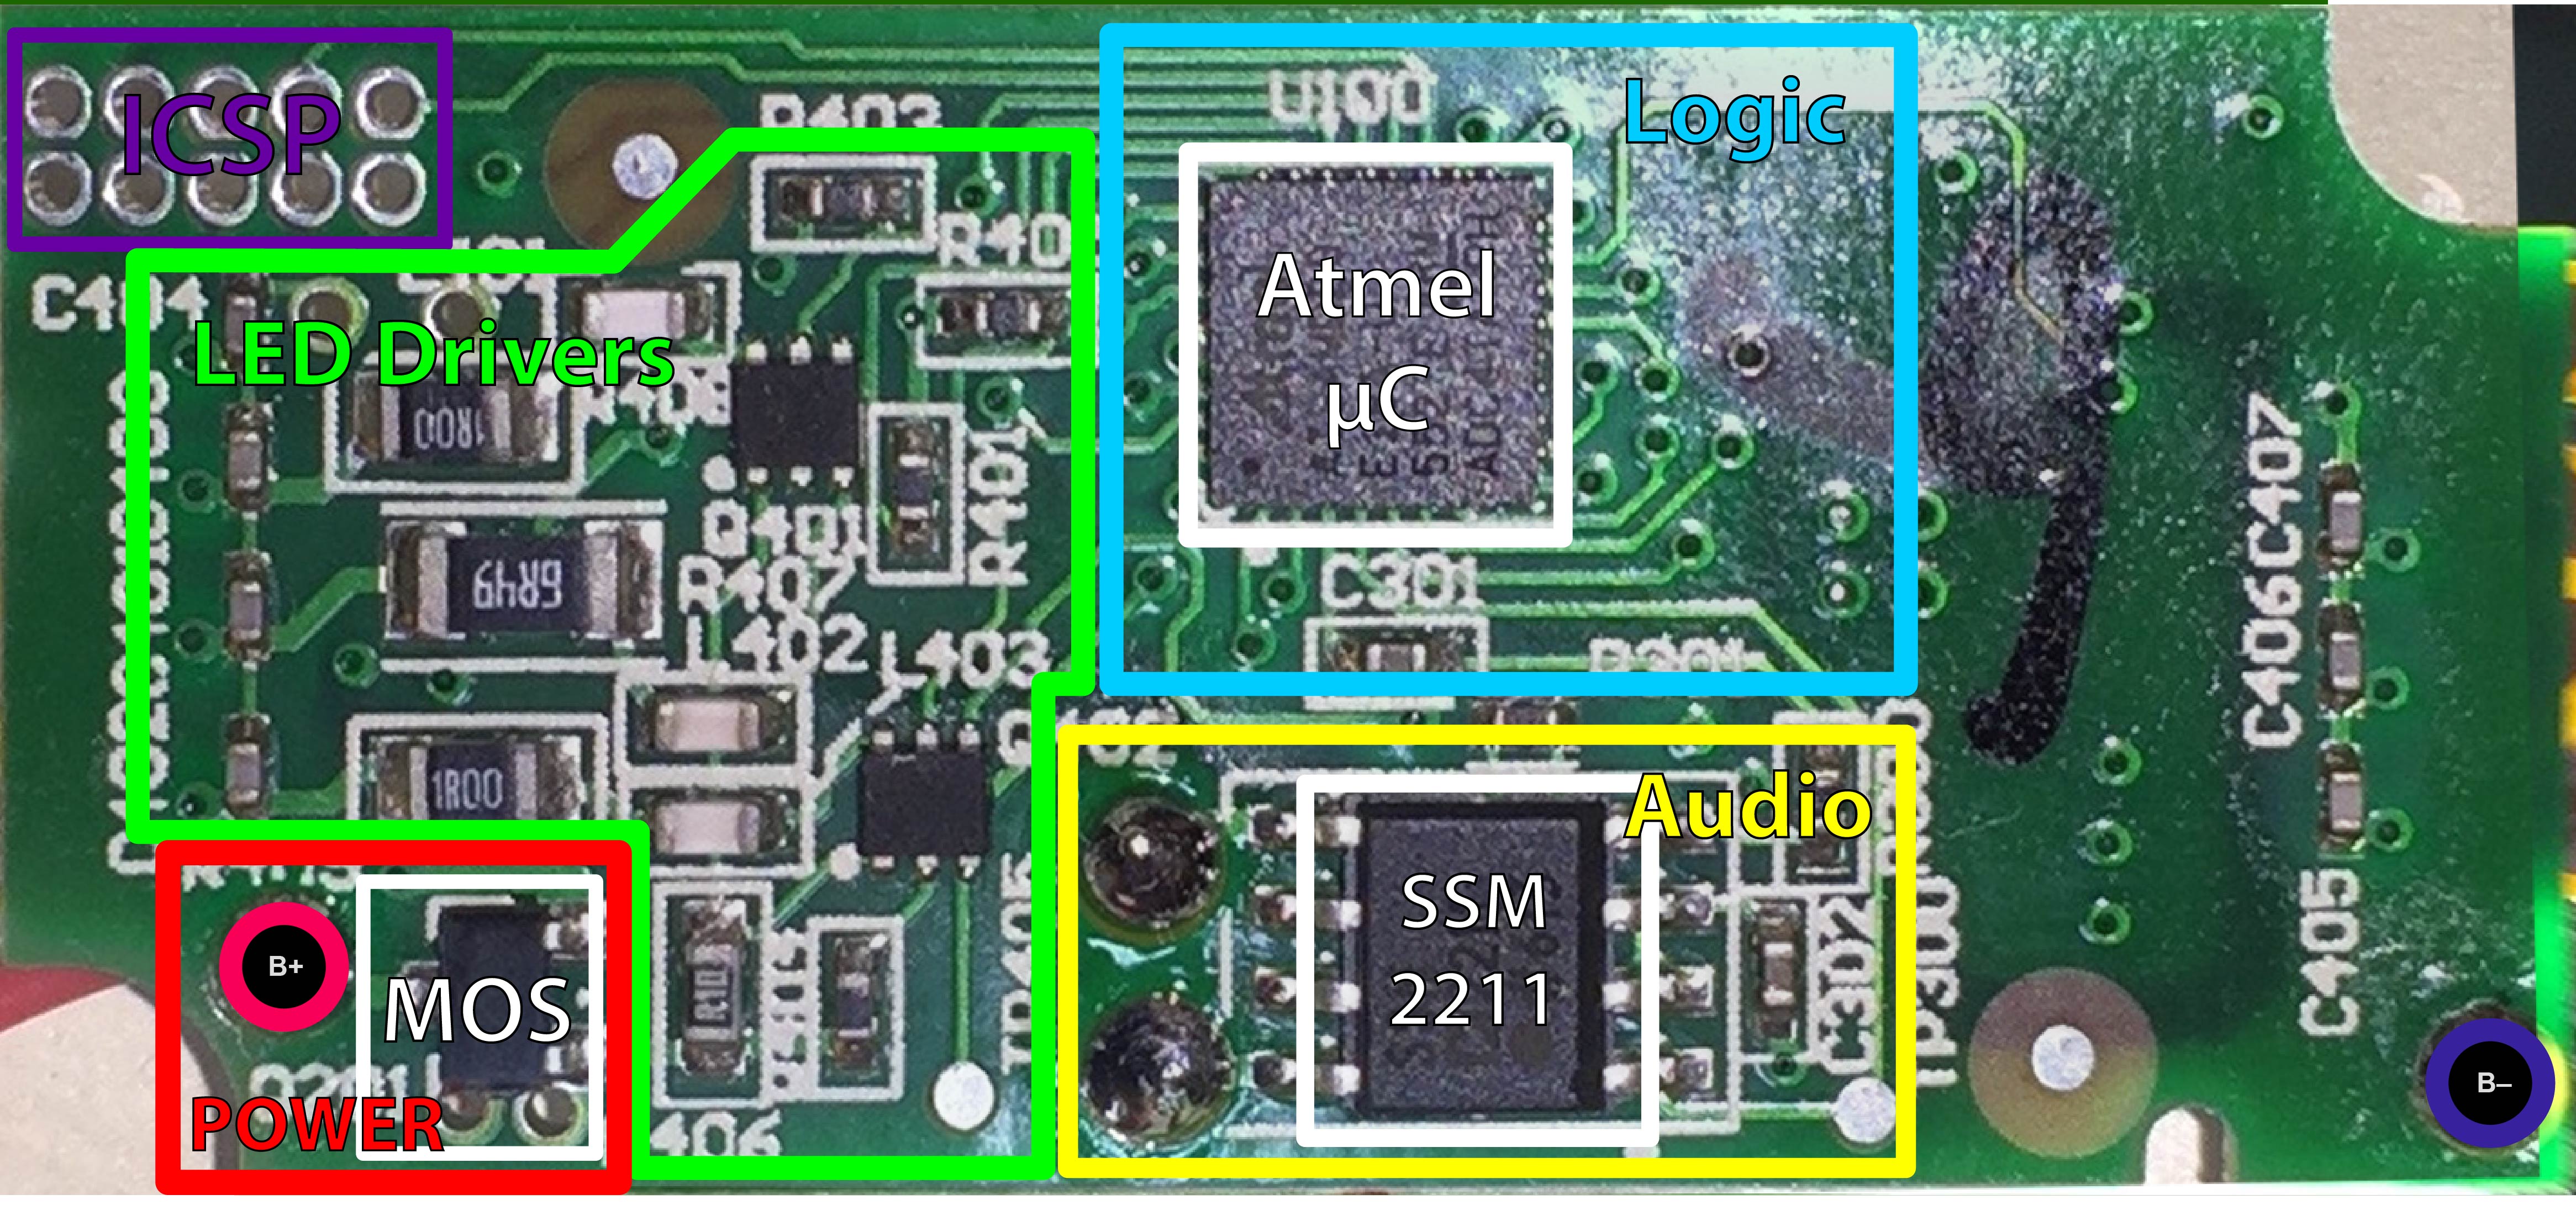
On the back, the main areas are the logic microcontroller, the audio amplifier, the LED drivers and a part of the power section that enables the connection of the battery to the voltage regulator on the other side.

Xyloband PCB Back

Composite image of the back of the Xyloband PCB.

On the back, we can see the following ICs:

The ARM processor is connected to the Si4362 receiver through I2C and decodes the information, namely the audio and LED colors. Then, it will light the LEDs through the driver and output the audio signal with its DAC.

The audio signal goes to the SSM2211 audio amplifier, which is connected to the speaker.

PCB Reverse Engineering

Now we are going to analyze the board and extract the tracks printed on it to obtain the full circuit schematic.

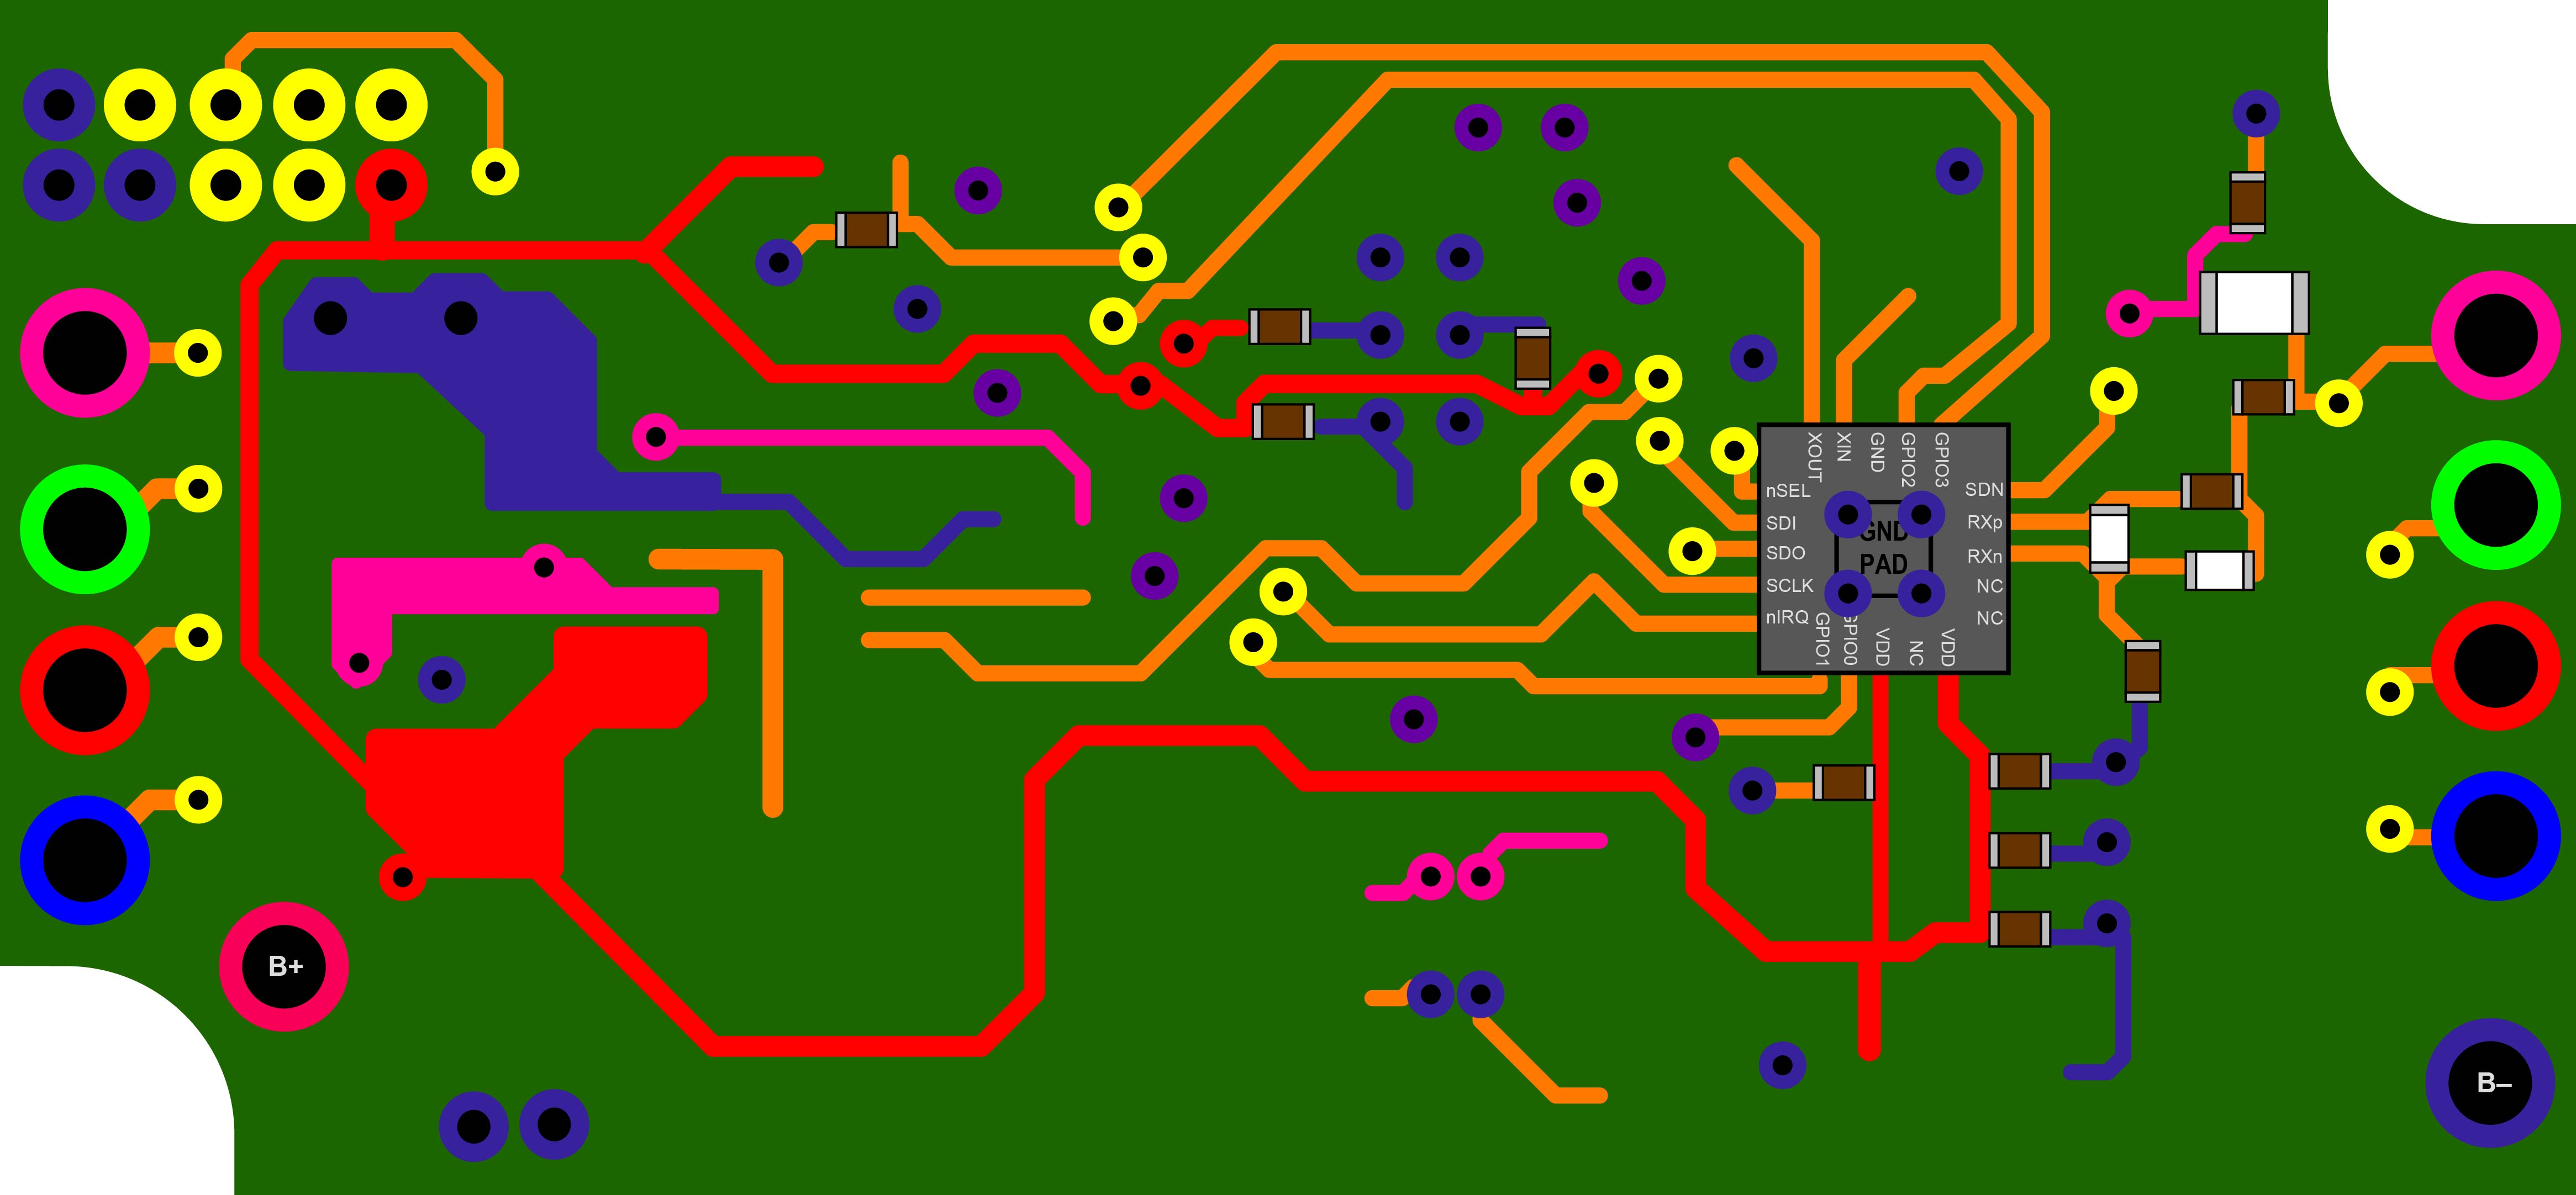
Front Tracks

Xyloband PCB Front Tracks

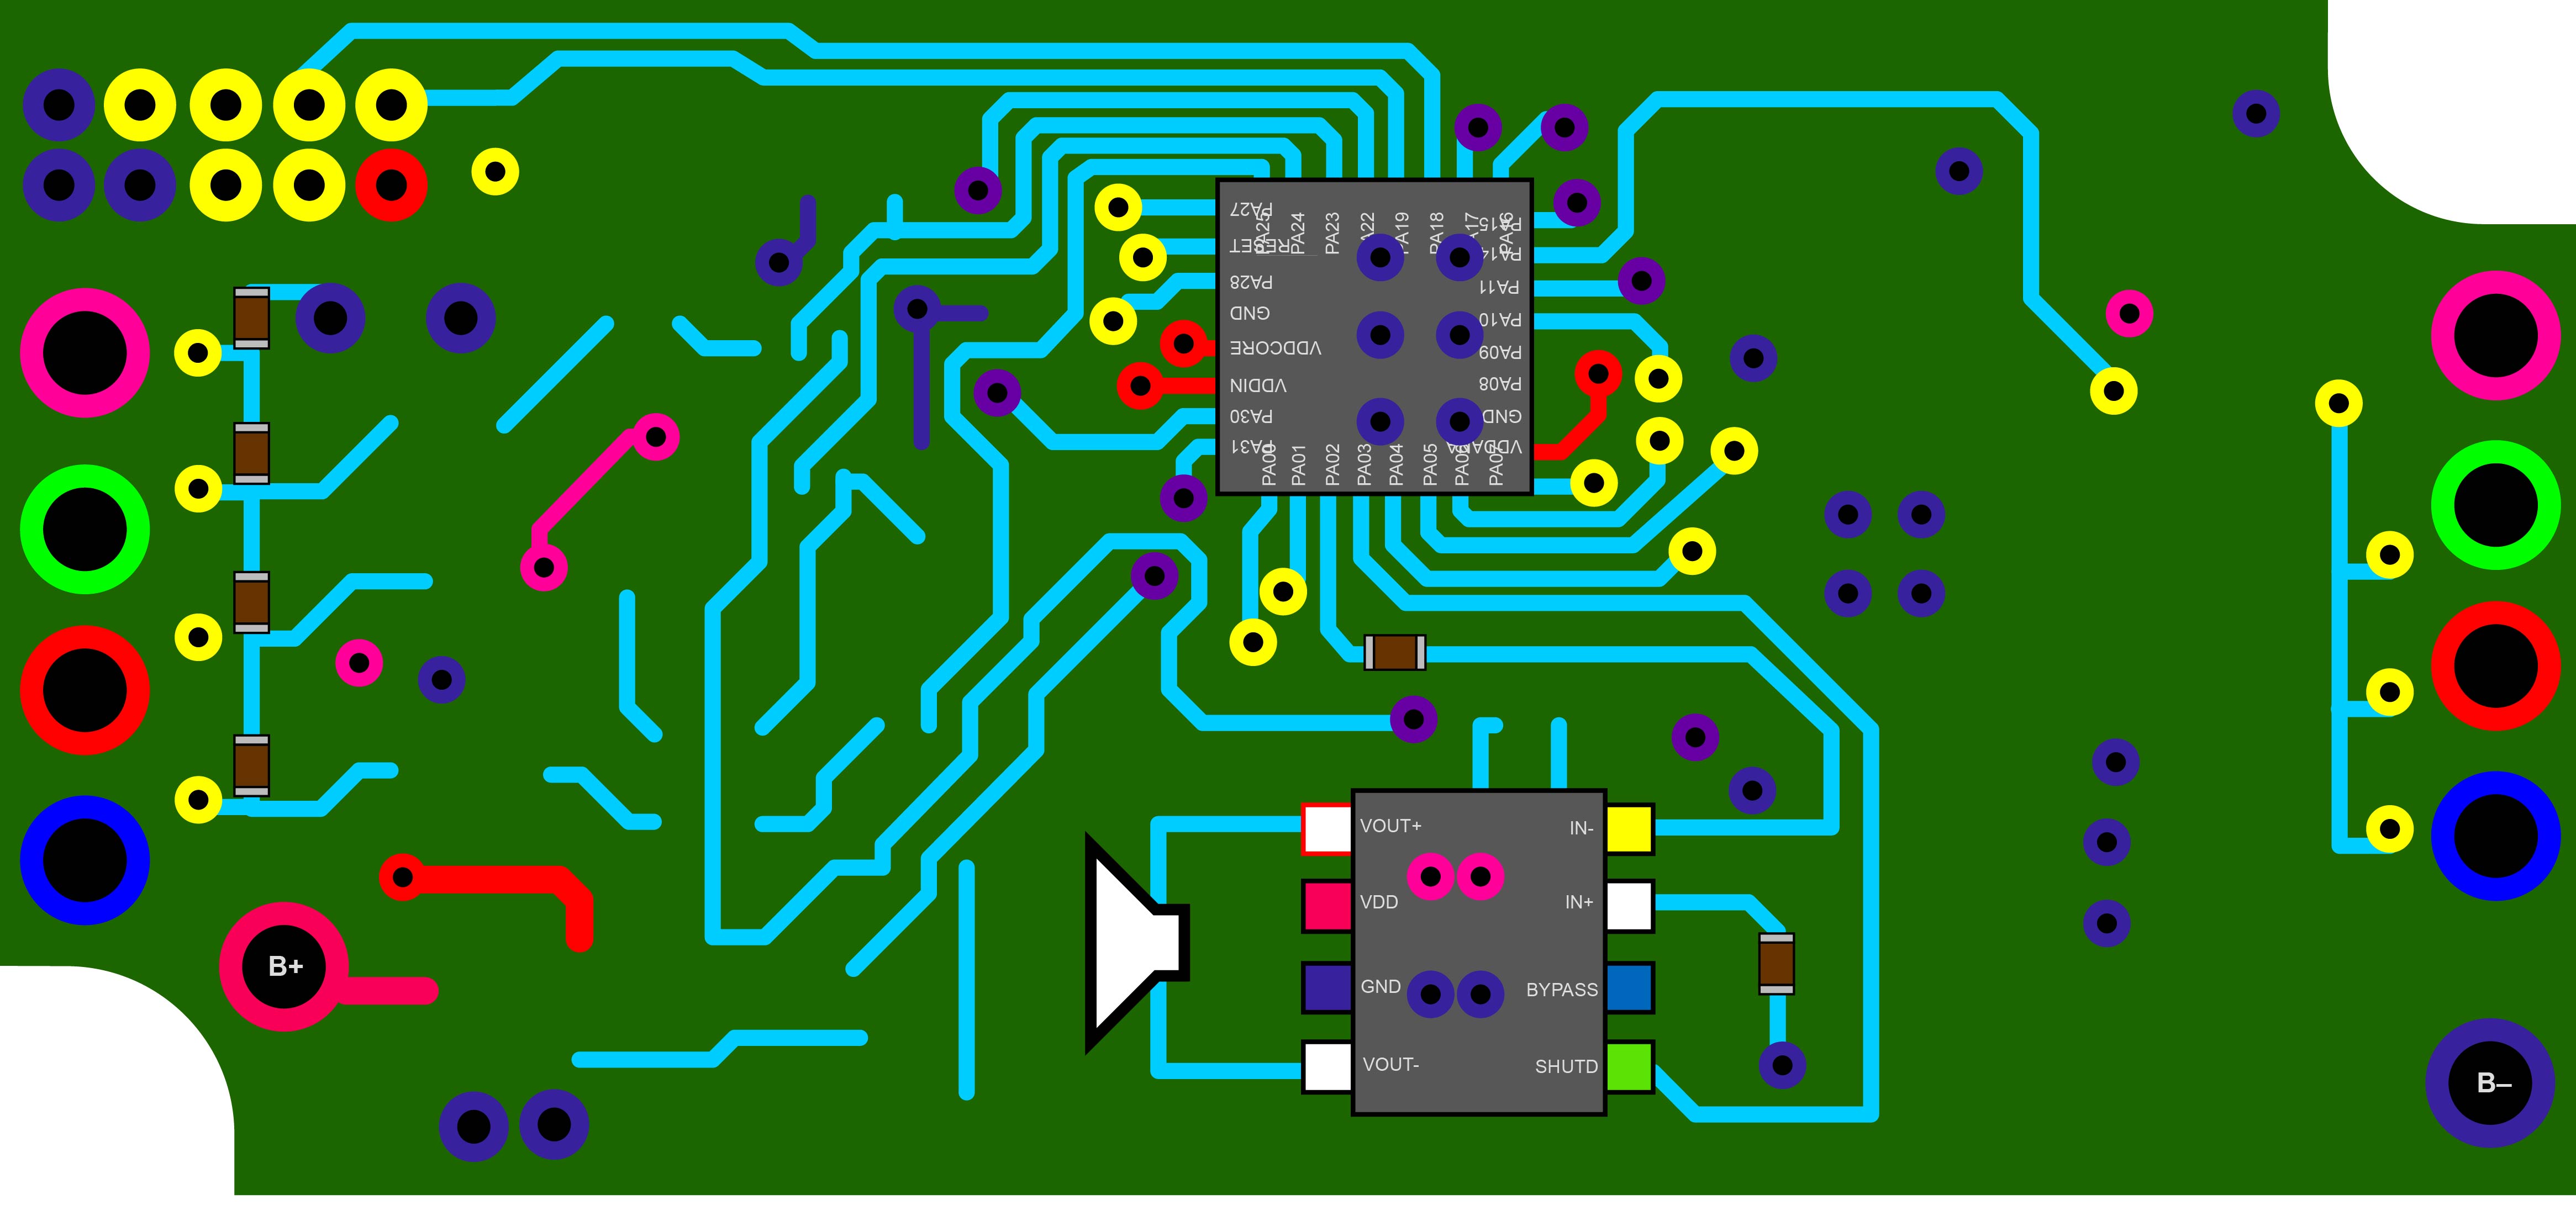
Back Tracks

Xyloband PCB Back Tracks

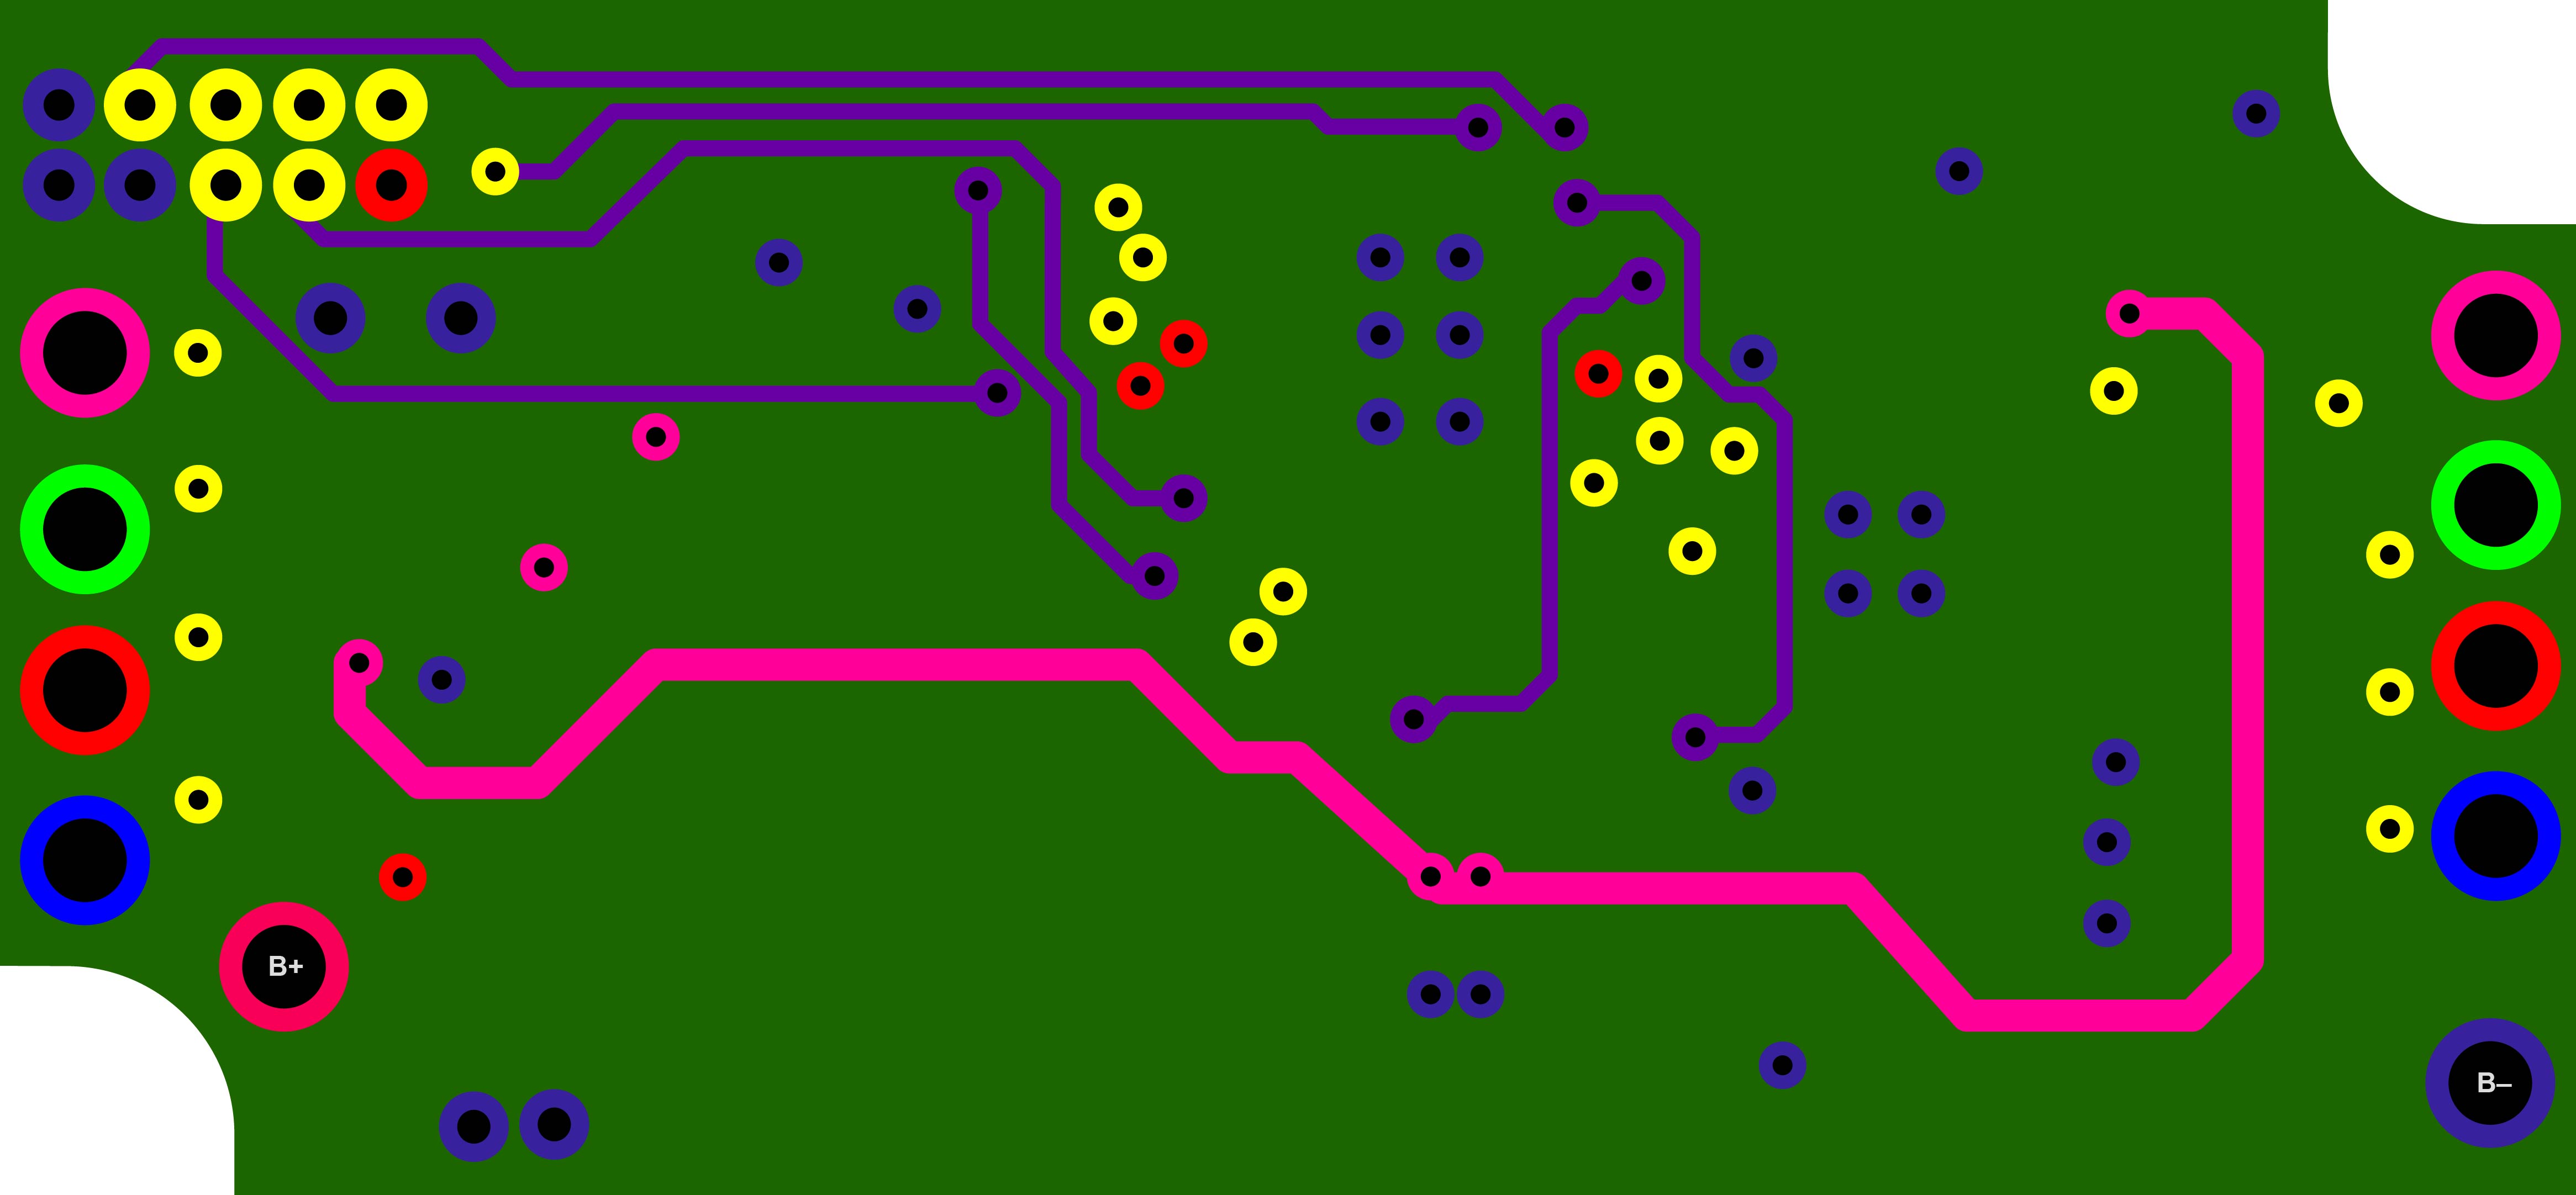
Internal Tracks

Xyloband PCB Inside Tracks

All Tracks Superimposed

Xyloband PCB Inside Tracks

Conclusion

The main controller of the Xyloband is an Atmel SAM D20, which outputs the audio and controls the lights of the wristband. The audio output is amplified by the Analog Devices SSM2211 low-distortion power amplifier and the LEDs are managed by three transistors. Finally, all the data is received and decoded by the Silicon Labs Si4362 receiver and sent through the I2C bus to the main processor.